The other evening I was wanging around on t'internet, as I often do, and thought I'd have a butchers at what Craftsy was all about as I kept hearing about it on Twitter and other people's blogs. If you're not familiar with the site, Craftsy offers a wide range of video tutorials and courses across a range of creative topics, from weaving to jewellery making, cooking and cake decorating to knitting and quilting. Naturally, it has a number of courses on sewing.
I took a look around and was quite intrigued by the concept but was unsure whether I could justify the cost of what was on offer. After all, YouTube has a wealth of free tutorials and for more personalised tuition I have my local sewing and craft centre, which offers great courses like the 4 week beginners course I recently completed. After clicking around a bit I left it there.
A day or so later I received an email from Craftsy offering me a discount on a course I had been looking at. I admit that their marketing worked and I decided to take another look. The course was about creating your own pattern and sewing an A-Line skirt, and after my A-line skirt pattern fiasco I thought perhaps that could be a way forward. As the course was so heavily discounted (I paid just £7.50 which I think was around 75% off) I decided to take the plunge and bought it.
I haven't yet watched the whole course but from what I have seen so far I am impressed. For such a small amount of money I've got unlimited access to 11 HD video tutorials which is around 4 hours in total. The course covers everything from taking accurate measurements to teaching you how to adapt the basic skirt pattern to add different finishes and details. The platform itself is very easy to use and has additional features like the ability to make personal notes on the videos and you can even ask the tutor questions directly and interact with other 'students'. You can see the course details here. I'll let you know how I get on with it when I start the project.
Friday 25 October 2013
Wednesday 23 October 2013
Little Lessons
Today I learned another little lesson. *sigh*. I thought I'd make the most of having a day off work to do some stitching. The boy had a day off and wanted to go guitar shopping to choose the birthday present I had promised him, so I took a day too. I planned to sew in the afternoon.
I had my two new Simplicity patterns (pajamas and A-line skirt) all lined up and the fabric for the PJs all washed and ready to rock. (I should say I know you can make PJ bottoms without a pattern but I wanted to ease myself into the world of commercial patterns gently with an item that is supposedly easy to do.) Sew anyway...*snarf*...I had planned to be a bit of a smarty pants and trace the pattern onto tracing paper so I could reuse it in different sizes if I ever needed to. I measured my dimensions, sussed out the size I needed, whipped out the pattern and tracing paper and....realised I had ordered the wrong pattern sizes for both garments. GGNAHHAH! I am usually a UK 10 on top and a 10-12 on my bottom half depending on the cut and material (more often a 12 than a 10 if I'm honest!). So I figured a pattern going up to a Medium would be fine. Well it's not - my measurements showed I needed a Large. So another little sewing lesson learned - sewing patterns don't size up in the same way as garments from high street shops. Having a little google around confirmed that this is a well known fact amongst you sewists. Why didn't anyone tell meeeeee?!
Luckily I ordered the patterns on Amazon using Prime so back in the post they go tomorrow for a refund. And I didn't do any sewing. Bah, humbug.
Thursday 17 October 2013
More Makes
Good job I don't have kids as I would be a terrible, negligent parent. Only a few posts in and I virtually abandoned my poor baby blog! Life got in the way over the last couple of weeks - the obligatory autumn illness, the boy's birthday and such. It did not, I'm glad to say, stop me sewing!
First up, the apron I made in Week 3 of the sewing course. It's a kind of cute, vintage style pinny and we also made matching polka dot head scarves - very funny.
I think it was the hardest thing we made so I'm surprised we didn't do this in the final week. The pleats especially were super tricky to do! It ties round the waist and is reversible - the same the other side just without the pocket.
Week 4 (the final week - booo!) was left open for the class to decide what we wanted to make. We settled on little bags/purses as we all wanted to learn how to sew a zip.
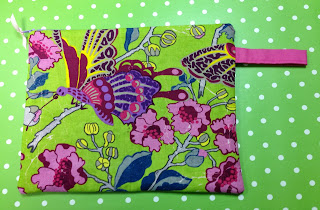
This is the first one I made in class and I mainly wanted to show you this because of their funky polka dot table covering! We were allowed to bust out the fancy fabrics for these - oooo, pretty!
I made a second, smaller one while I was there (brown one below) and then another one when I got home (you can never have enough small purses to put things in, right?!) that I made flat-bottomed so that it stands up.

They are all lined with complementary material.

First up, the apron I made in Week 3 of the sewing course. It's a kind of cute, vintage style pinny and we also made matching polka dot head scarves - very funny.
 |
| Guess who found the 'effects' options in iPhoto! |
Week 4 (the final week - booo!) was left open for the class to decide what we wanted to make. We settled on little bags/purses as we all wanted to learn how to sew a zip.

This is the first one I made in class and I mainly wanted to show you this because of their funky polka dot table covering! We were allowed to bust out the fancy fabrics for these - oooo, pretty!
I made a second, smaller one while I was there (brown one below) and then another one when I got home (you can never have enough small purses to put things in, right?!) that I made flat-bottomed so that it stands up.

They are all lined with complementary material.

I think of the four weeks, these little bags are the things I am most pleased with in terms of the finished items. They are also a great little make as it takes such little fabric - you can practically make them out of scraps.
So, the four week course flew by. I was toying with the idea of signing up to the six week dressmaking course that starts this month but I decided I wanted a little more sewing experience under my belt first as I would get frustrated trying to do something so much more advanced. There is another four week course starting in January on a similar level to the one I just completed but making different things so I think I will join that one instead.
In between times I will keep my sew on. I have just yesterday ordered my first pattern (eeek!). On the advice of Tilly I am going to have a stab at the McCalls 5248 pattern for some PJ bottoms. I will show and tell once complete.
Bon weekend, folks, when it gets here!
Saturday 28 September 2013
Cushions and Carriers!
Another busy week has come and gone and another fab sewing class attended. I really enjoyed this week and I feel like I'm getting to grips with the construction side of things and the techniques are starting to make sense.
This week we made cushion covers. The idea was to embellish them, but as you will see from my pictures I kept mine fairly plain. This was partly because I prefer an unfussy style but also because I decided to keep things simple and not overstretch myself in the class as I didn't want to feel rushed. As it happened I could have probably done more as I had time to spare at the end. It wasn't wasted though, as I spent the time picking our tutor's brain with all my many sewing queries, playing with the fancy stitches on the machines (we're using a Singer Confidence which is a great machine to play with) and even learning how to sew a button hole! Ooo, fancy!

This is my cushion front. I love the flower power material, which I think was an old duvet cover. I embellished it with a denim style ribbon which matches the back. I wanted the ribbon over the the left a bit more but it didn't quite work out that way!

This is the back, which is made of an off-cut of lightweight denim, The yellow insert with the buttons is made from a recycled man's shirt - ingenious! I love the fact that the class encourages recycling and upcycling.
This week's project was quite timely as we're in the middle of decorating our living room and this will be the first cushion to proudly adorn our new sofas when they arrive next week!

I was such a keen little sewing bunny after my cushion success that I did some more sewing at home today and produced this little wonder(!).
Oh, you say you can spot the deliberate mistake? No, silly, owls are meant to hang upside down like bats, right? Oh. Well it holds my spare carrier bags just fine and seeing as it's going to take pride of place hanging in the garage this time I will save my blushes...
Tomorrow was going to be pyjama bottom making but, frustratingly, I'm about two inches short of the fabric I need so that will have to wait. I'm sure I will find something to make though - I'm becoming an addict!
Monday 23 September 2013
My First Class
Last week was a busy one in the Oh Sew Quiet house! Between decorating our lounge/diner (everything is upside down, everywhere), the boiler going on the blink, dropping and smashing my iPhone to smithereens (sob!) and you know, working and stuff, I managed to get to my first sewing class.
First, a quick run down of the class. There were five of us in total - me and three other women around the same age-ish (Iate 20s to mid 30s I'd guess - hope that wouldn't horribly offend any of them!) and a more mature lady. Everyone was very friendly which made it relaxed and enjoyable. Most of us had done some basic tinkering on a sewing machine, some a little more than others I think, but the pace and level seemed to cater for us all, thanks to our very knowledgable and pleasant tutor.
During the first week we were making reversible tote bags with a patch pocket. The tutor took us all the way through the process from choosing and cutting our fabrics to sewing on the final button. She found a nice balance between standing back and giving us the confidence to get on with the task and then stepping in and lending a helping hand when we needed (as she needed to for me, several times!). The class was two and a half hours between arriving and introducing ourselves to each other over cups of tea to stepping out the door to go home. So, without further ado, this is what I managed to make in that time.

I think its failings are fairly self evident! A bit on the wonky side ("rustic", I tell you), and the ribbon loop is too long to go over the button properly. I think I'll probably snip and put a stitch in that to shorten it. The main reason for the wonk is that I made the inner lining of the bag a little larger than the outer, so when they were sewn together the outer puckered and skewed. The tutor helped me rescue it by putting a clever little fold/dart in the front under the button that you can't really see in this picture. Nevertheless...it resembles and functions as a bag!
I decided to make another bag at the weekend, partly to reinforce the methodology in my mind (which sides to sew together when putting the inner and outer pieces together, how to get the handles in properly etc) and partly to try to better it at a second attempt with more time. I wouldn't say the class is rushed but I did feel a little pressured to get the bag finished in the last 45 minutes so I think I could have done better. That's about me though, not the class - I put pressure on myself.
So, second time round and this was the result.

Again, it's a little hard to see the detail in the picture (must work on that). This time things went better, but I did take my time doing it on a Sunday afternoon whist half watching Take The Lead. Lessons learned this time was that the material was too flimsy for the size and shape of the bag (I wanted to make a squarer bag but one this size would need a sturdier fabric). And again, I didn't get the button/ribbon loop spot on. The actual sewing part was fine though and I got the seams quite straight (despite the funny angle it sits at in the picture!). I love the little owls! The pocket and straps were made from an old dress that I no longer wore.
I know most sewing bloggers create and present things that are much better and more sophisticated than this but I am ok with it. I am new to all of this and I see each error as a lesson learned and a skill practised. I'm enjoying the learning process and I'm really pleased that I enrolled in the class. This week we're working on embellished cushions so I'll post about my creation afterwards!
Monday 16 September 2013
So What's With the Quiet?
When I was trying to think of a name for this blog I played with a few "Oh Sew..." variants, many of which were already taken. Then "Oh Sew Quiet" popped into my head and I suddenly realised it was perfect and wondered why I hadn't thought of it before. I thought I would explain further.
If a total stranger (i.e. you!) asked someone close to me to describe me I'm not sure they would necessarily say "introvert". I think that often, when someone thinks of what an introvert looks like they might say "shy" or "quiet". I identify as an introvert but I'm not really either of those things. I can talk to strangers pretty easily, I like people and I'm not too shabby when asked to make a presentation at work. However, I still think of myself as an introvert.
One of the main characteristics that aligns me with the world of introverts is what tires me and what energises me. I'll be honest, I'm not at all keen on parties or big group gatherings. Even though I'm getting on a bit (30+!) it's not an age thing - I've been this way forever. When I was younger, and especially when I was at university, I felt like I *should* love going to parties and hanging out with tons of people. I felt bad that in actual fact that really did little for me and actually made me feel like I needed to retreat and recover. What I have found, and accepted, over time is that I much prefer and value time spent with a few people at a time, when I can actually share thoughts and ideas and connect on a more individual level. I also value time to myself, even though I don't think of myself as "antisocial".
Another real challenge for me is noise. Whether the noise be music, a cranked up TV or just a lot of background chatter, I often feel noise to be exhausting. I mean genuinely, physically tiring. I only realised this about myself in the last couple of years. In the past I would feel that my shoulders were hunched and I was feeling tense and irritable without knowing why. Now I realise - turn off that damned radio or move to a quieter workspace, and instantly, as if by magic, I can feel ten times better. It's like a world of stress has lifted from my shoulders. Odd, huh?
My communication styles and preference also fit with an introverted personality type. I find that I can express myself much more fluently in writing than in speech - both in English (my mother tongue) and in French (which I have studied to a fairly advanced level).
I used to beat myself up a bit for being the way I am. However I now understand that I am not alone and, in fact, there is a greater understanding/appreciation around nowadays for introverts (this is one of my next reads). I still think society at large is more geared towards accepting and rewarding extroverts. That is perhaps another post for another day.
All of this is another reason, I think, why I am finding that I enjoy the calm and peace I feel when I am sewing. Even when I am cursing because I have messed up again!
So that's the story behind "Oh Sew Quiet". And besides, it's a funky song, even for an introvert ;-)
Sunday 15 September 2013
Starting Out With A Skirt
I start my short sewing course next week and, although it is aimed at beginners, I wanted to feel prepared and not look like the class dunce! So I found some time this week to crack out the sewing machine and have my first real attempt at making something. After a bit of deliberation I decided to start off with a simple, elasticated skirt.
I watched a few YouTube videos and read a couple of blog posts that all featured a similarly constructed skirt. In the end, because I was feeling a bit overwhelmed and underskilled, I decided to just go for it based on what I had watched and learned without following any one tutorial in particular. I guess I worked most closely, though, to this video tutorial from Brett Bara from her book Sewing in a Straight Line

I watched a few YouTube videos and read a couple of blog posts that all featured a similarly constructed skirt. In the end, because I was feeling a bit overwhelmed and underskilled, I decided to just go for it based on what I had watched and learned without following any one tutorial in particular. I guess I worked most closely, though, to this video tutorial from Brett Bara from her book Sewing in a Straight Line
And, (*drum roll*) I managed to make this (*taadaa!*)

Although the end result is far from perfect, it is definitely passable and overall I feel quite pleased with my first project. I was chuffed that I managed to get the hem and tunnel for the elastic (there's probably a proper word for that!) quite straight. I did make a booboo and sew in the elastic before doing the vertical edge of the skirt meaning that I had to sew over the elastic to finish, but it hasn't affected the way it looks or wears.
I picked the wrong time of year to make such a summery skirt though, and as I look out of the window at the pouring rain and dark skies I think it may have to go into the wardrobe until next spring!
Subscribe to:
Posts (Atom)